
Scope: Malaysia statutory payroll (EPF, SOCSO, EIS, PCB, SKBBK), from org setup through to a paid batch. Rates, brackets and deadlines are not repeated here; those live in the Compliance handbook and update on their own schedule, this guide only covers how the software runs the cycle.
What this guide is not: an HR guide. The employee record you set up here belongs to Cloudby’s HR module underneath, but only its payroll-relevant view is covered, since that is the only part live in the product today.
1. Set up payroll once
Payroll setup is split across three places, not one screen. Knowing that up front saves you hunting.
First, a Finance setting, not a Payroll one. Go to Menu > Finance > Settings > Default Ledgers and set Accrued Payroll. This is a Liability ledger, and Cloudby will not let you run a single payroll batch without it, since it is where each batch’s net pay owed to employees is recorded until it is actually paid out.
Second, Payroll’s own Default Settings screen, which is deliberately thin. Go to Menu > Payroll > Settings > Default. The only field here is Commence Date, the first day payroll should start processing from, ignoring any hire dates before it. That is the whole screen. Do not go looking for more here, the real configuration lives in the next step.
Third, and this is the real setup work: the Payroll Setup Wizard. Go to Menu > Payroll > Payroll Items, then click Setup Wizard. This lists every payroll item Cloudby knows about for your country (Malaysia’s EPF, SOCSO, EIS, PCB and SKBBK, plus universal ones like Salary and Bonus) and lets you switch on the ones your business needs. Switching one on opens its own short configuration form right there in the list.
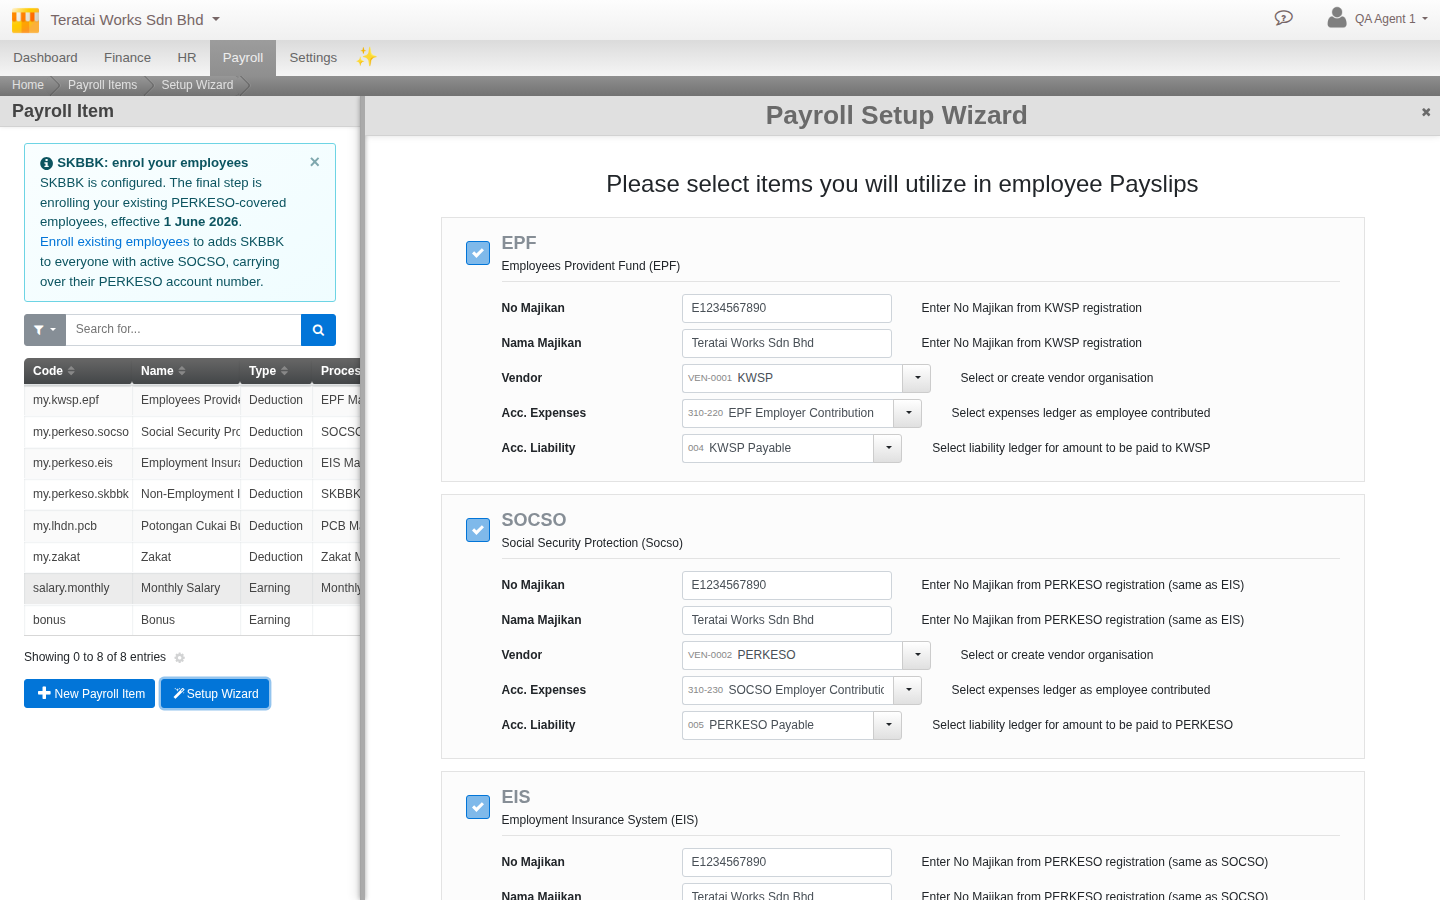
For a statutory item like EPF, the form asks for your employer registration number and name, a vendor to represent the statutory body (with a suggestion to auto-create one, for example KWSP), and the Expense and Liability ledgers that item’s postings should use (again with sensible auto-create suggestions). SOCSO, EIS, PCB and SKBBK each follow the same shape, their own vendor, their own pair of ledgers.
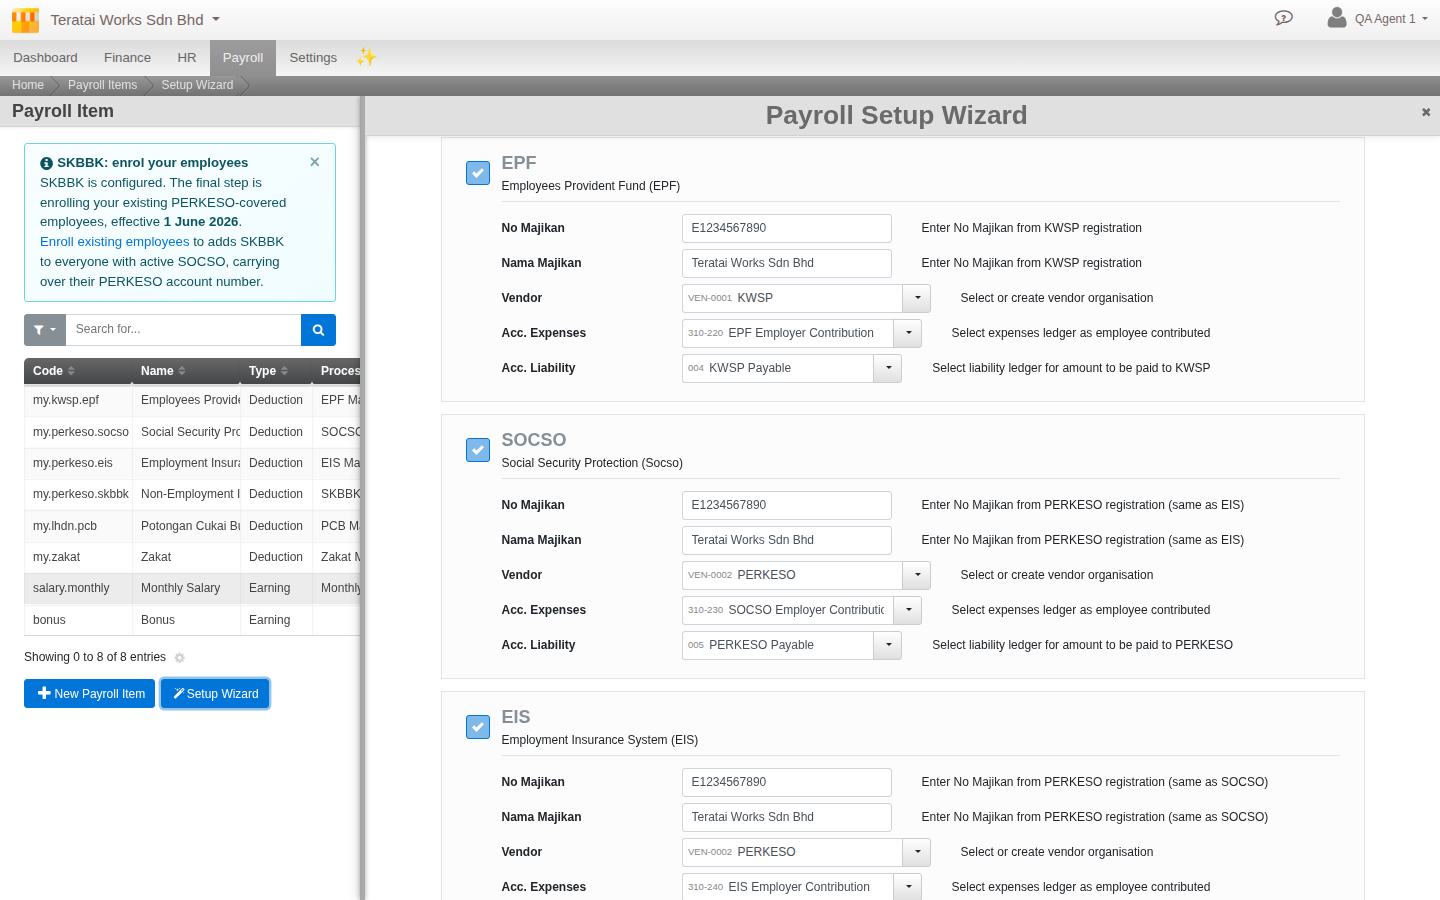
You will know setup is complete when Cloudby stops nagging you about it (a dashboard notice appears otherwise). That check fails for two reasons only: an installed item is missing a required vendor or ledger mapping, or not a single employee has been enrolled into any payroll item yet, which is exactly what the next step does.
2. Set up an employee to be paid
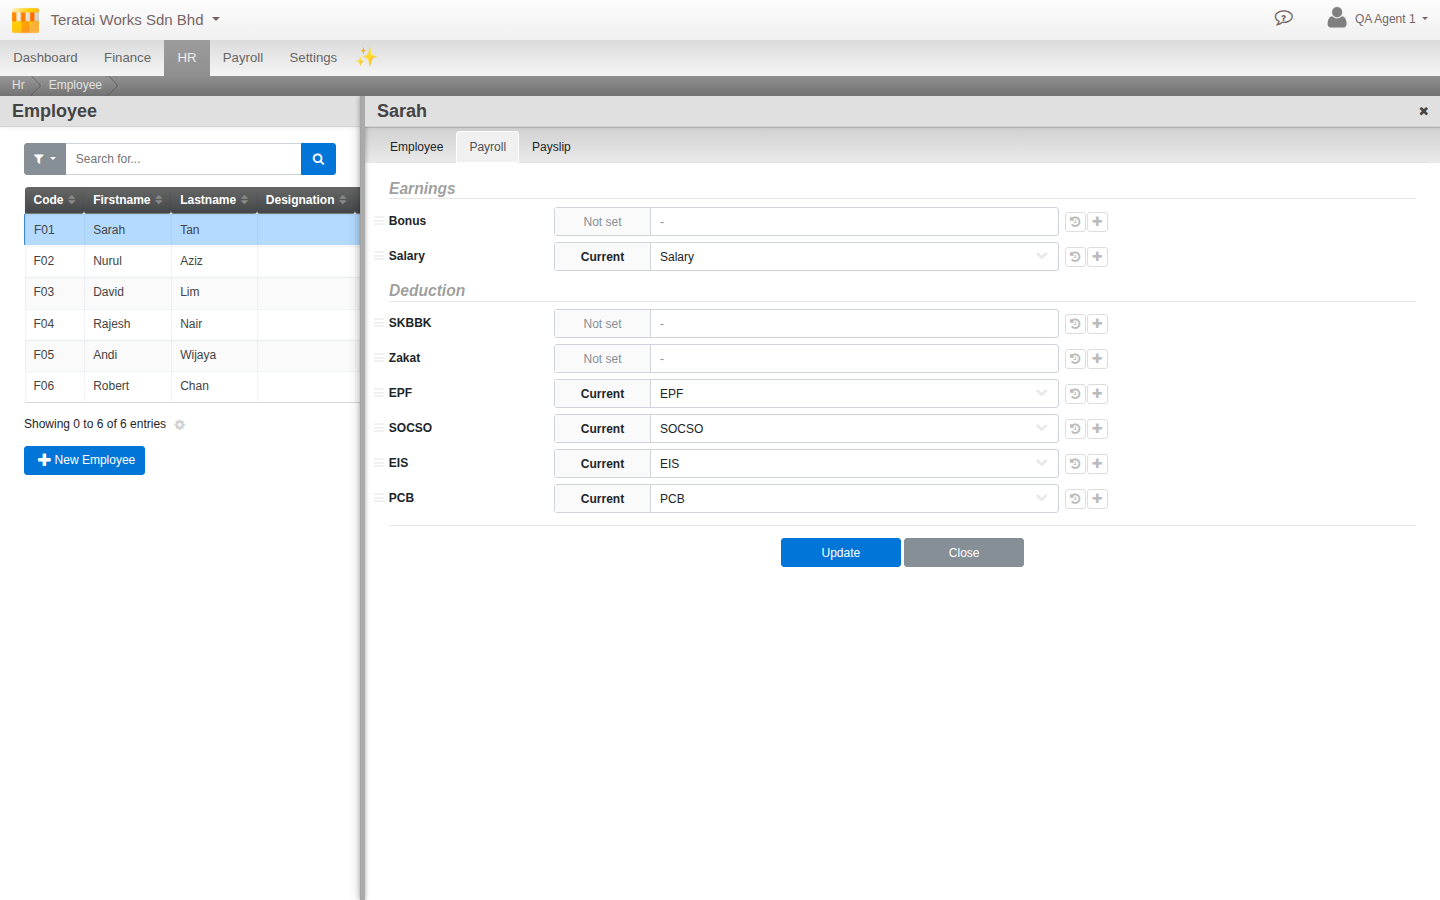
Go to Menu > HR > Employee. Worth noticing before anything else: this lives under HR, not Payroll, because it is the same underlying employee record Cloudby’s HR side owns. Three tabs render on it today: Employee (the person’s basic details), Payroll (what they are actually enrolled into), and Payslip (their pay data and history once batches start running).
There is no single “basic salary” field on an employee. Salary itself is just another payroll item on the Payroll tab, exactly like Bonus or a statutory contribution, each one currently either Current (enrolled) or Not set. Enrolling someone into Salary works the same way as enrolling them into EPF: pick the item and set its own details, and a history icon next to each one lets you see how it has changed over time.
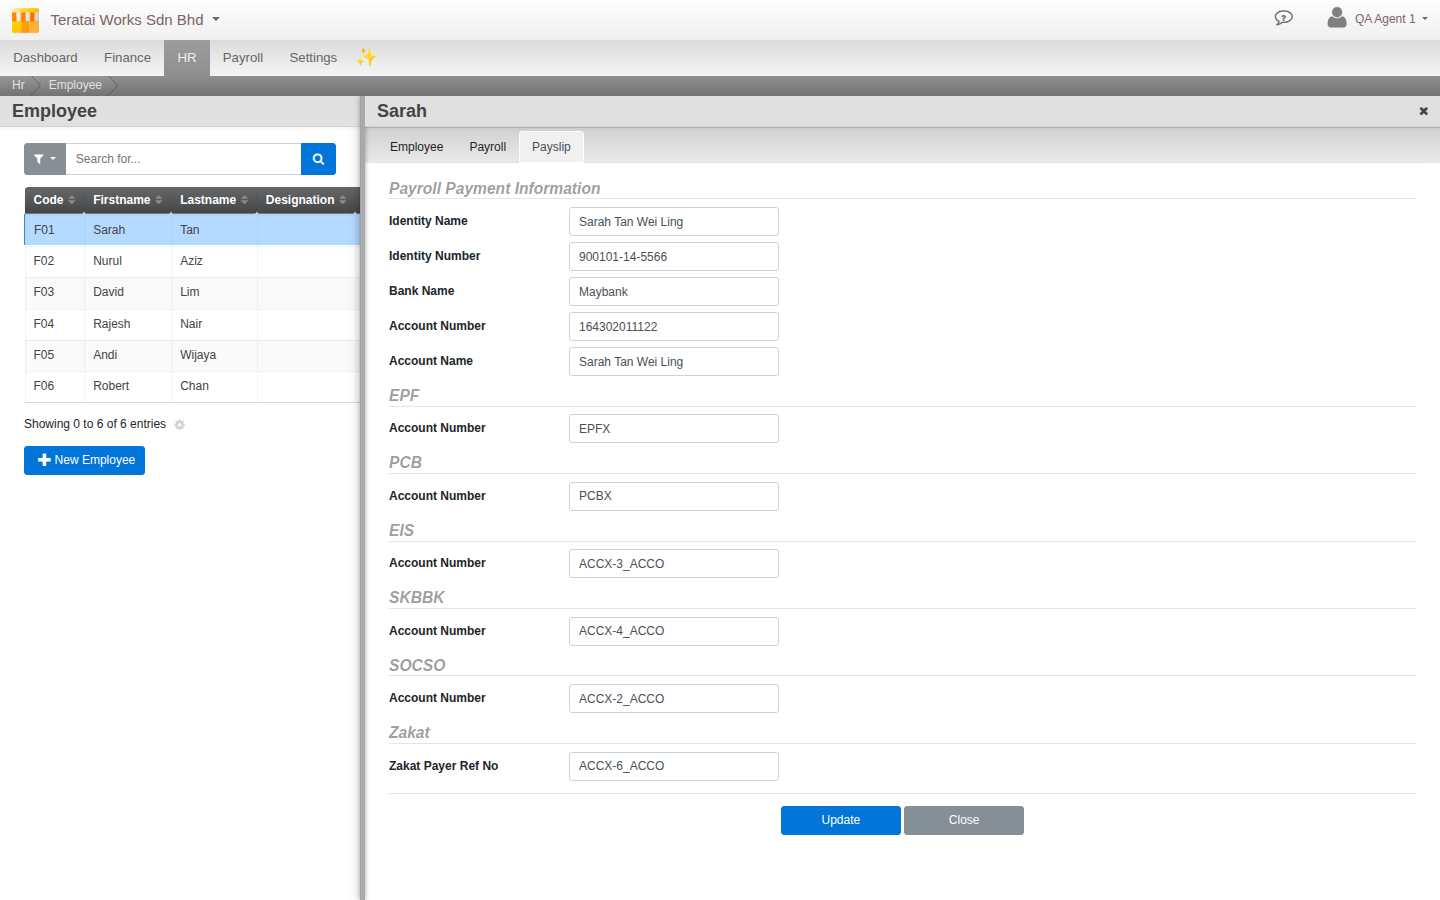
Bank details for salary crediting live one tab over, on Payslip, under a section called Payroll Payment Information. This is where an employee’s bank name, account number and account holder name actually go, and it is a permanent part of every employee’s record, not something you switch on separately. The same section also holds each statutory scheme’s own account number for that employee (EPF, SOCSO, EIS, PCB, SKBBK, Zakat all have their own field here), which is the same data the bank-file export in step 6 reads from.
3. Run a payroll batch
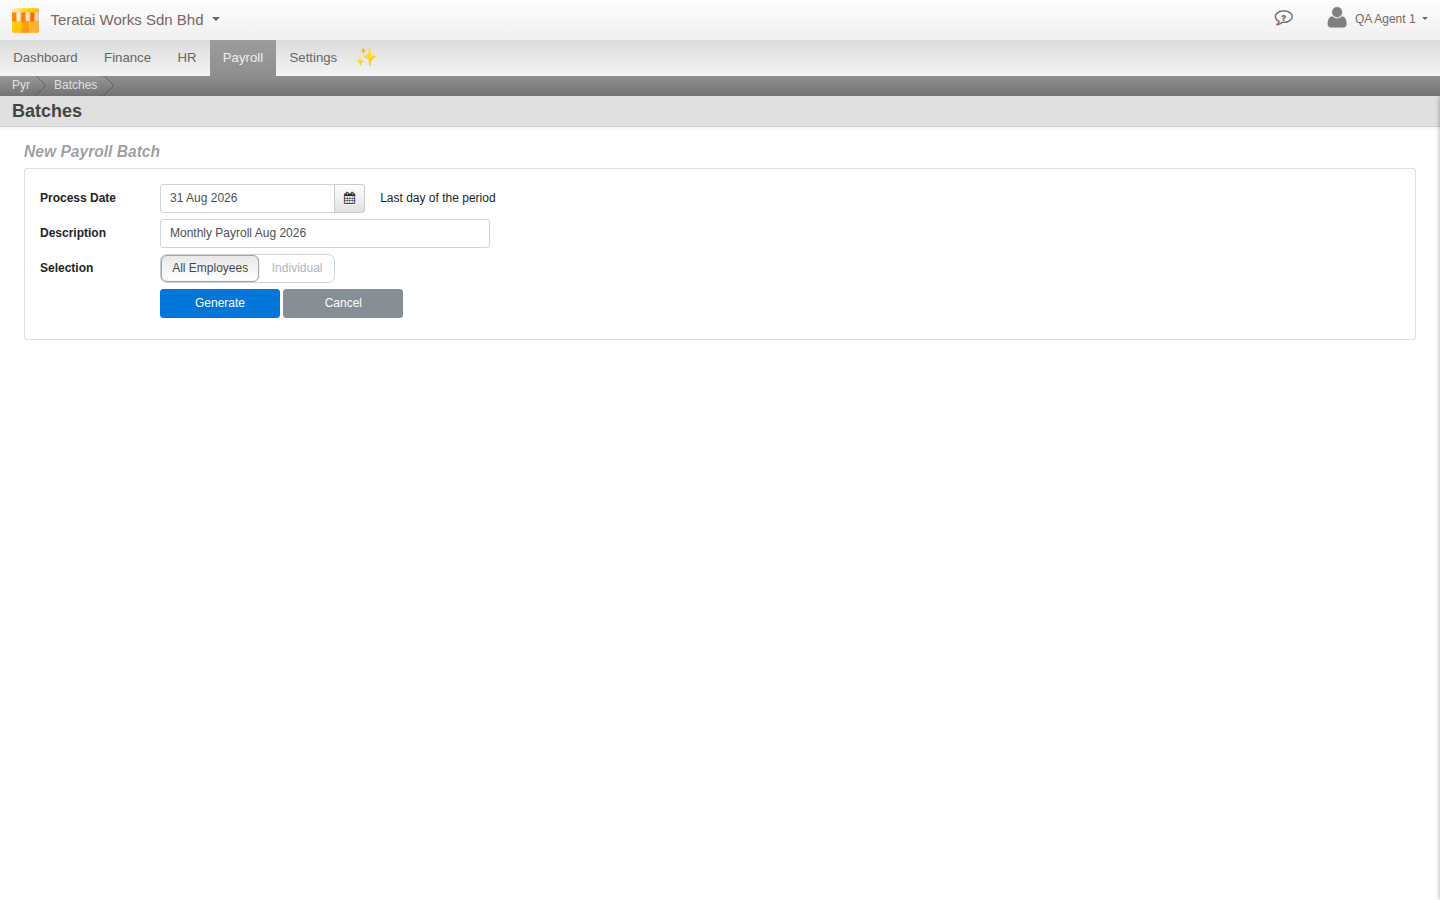
Go to Menu > Payroll > Batches and start a New Payroll Batch. Pick a Process Date, the last day of the cutoff this run covers (Cloudby suggests the month after your last run, and will not let you pick a date before your last closed accounting period), and whether this batch covers All Employees or just specific ones. Click Generate.
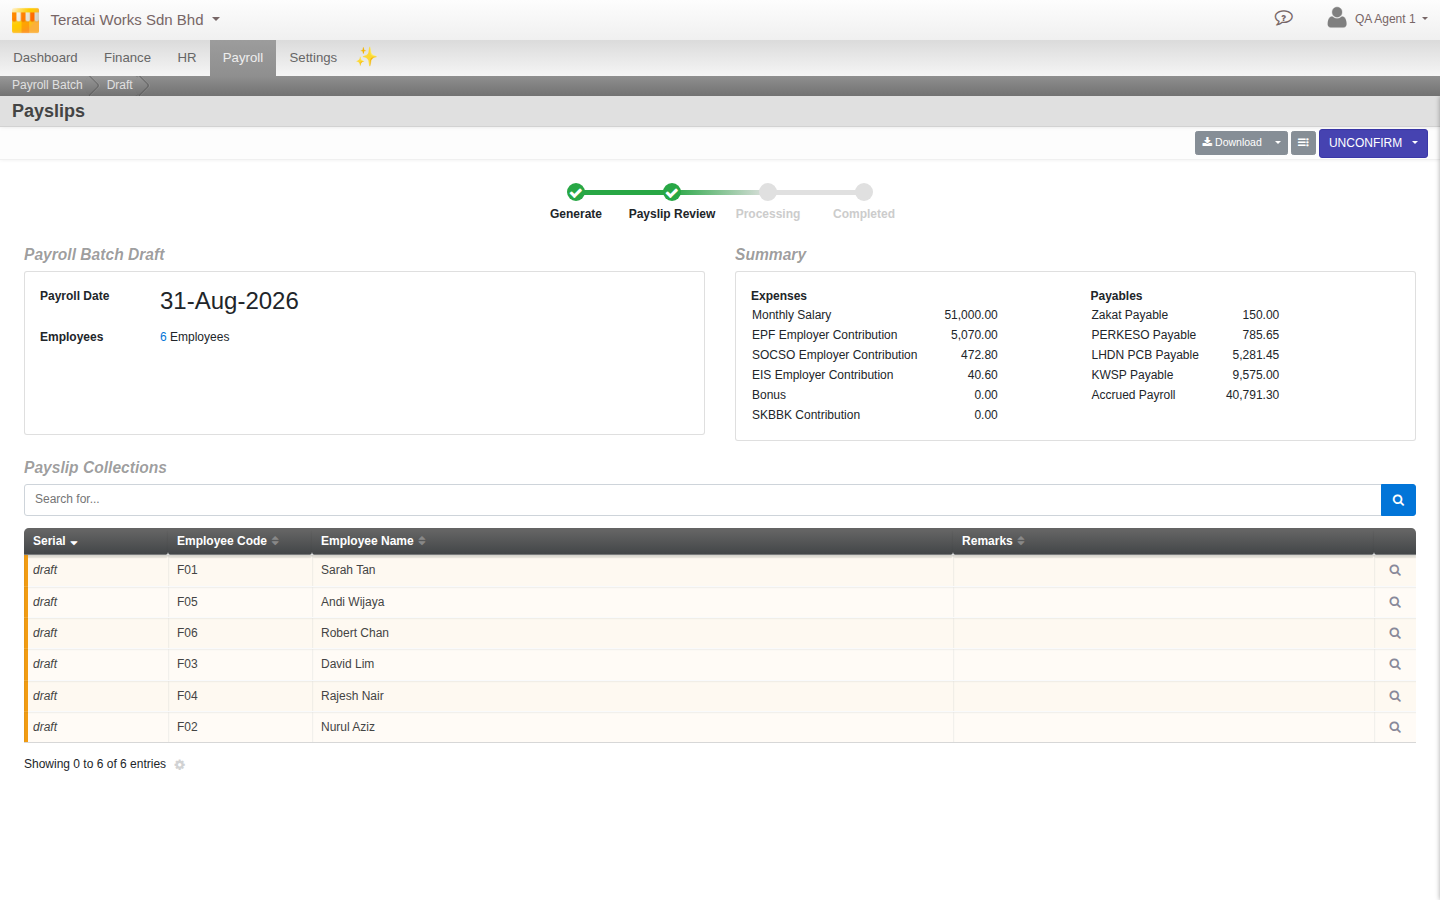
Generating creates a batch with one payslip per employee, calculated in full: earnings first, then each statutory contribution worked out against the correct contributable wage, in the order the law expects. While the batch sits at this first stage, nothing is final, you can regenerate it if something needs to change. The Expenses and Payables totals on the summary panel are already a real preview of what confirming will post.
4. Confirm the batch, and what that actually does
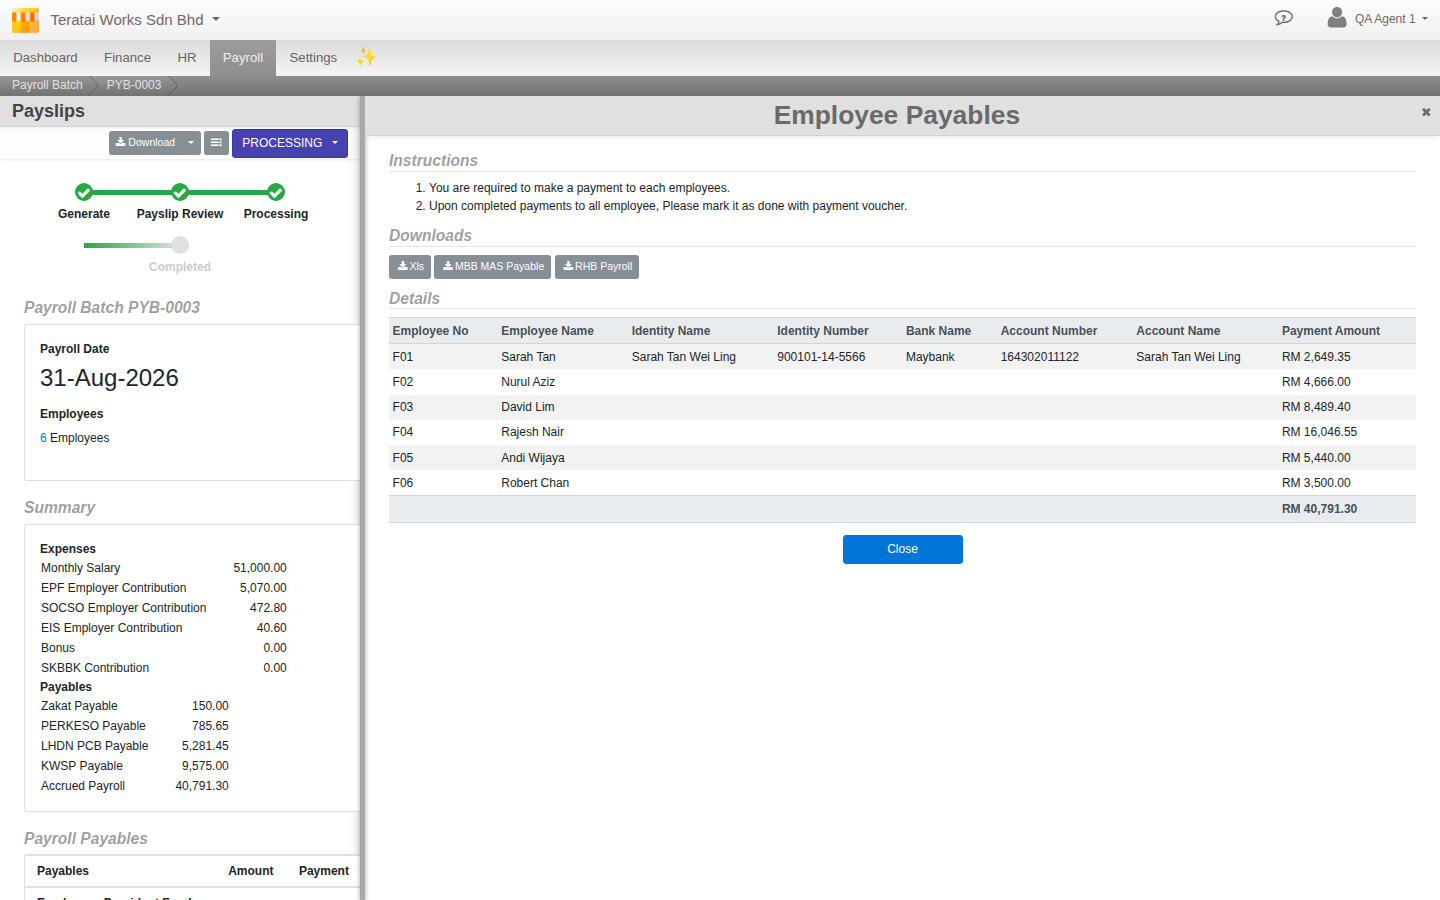
Once the Draft looks right, Confirm it. This is the step that matters most to get right in your head, because it is where the real accounting happens: every payslip posts to your ledgers in one aggregated journal for the whole batch, and Cloudby generates the payable records that carry what is now owed forward to be paid. The batch status moves to Processing, and a real Payroll Payables table appears, one row per statutory scheme plus one aggregate row for employees’ own net pay, each with its own Payment action.
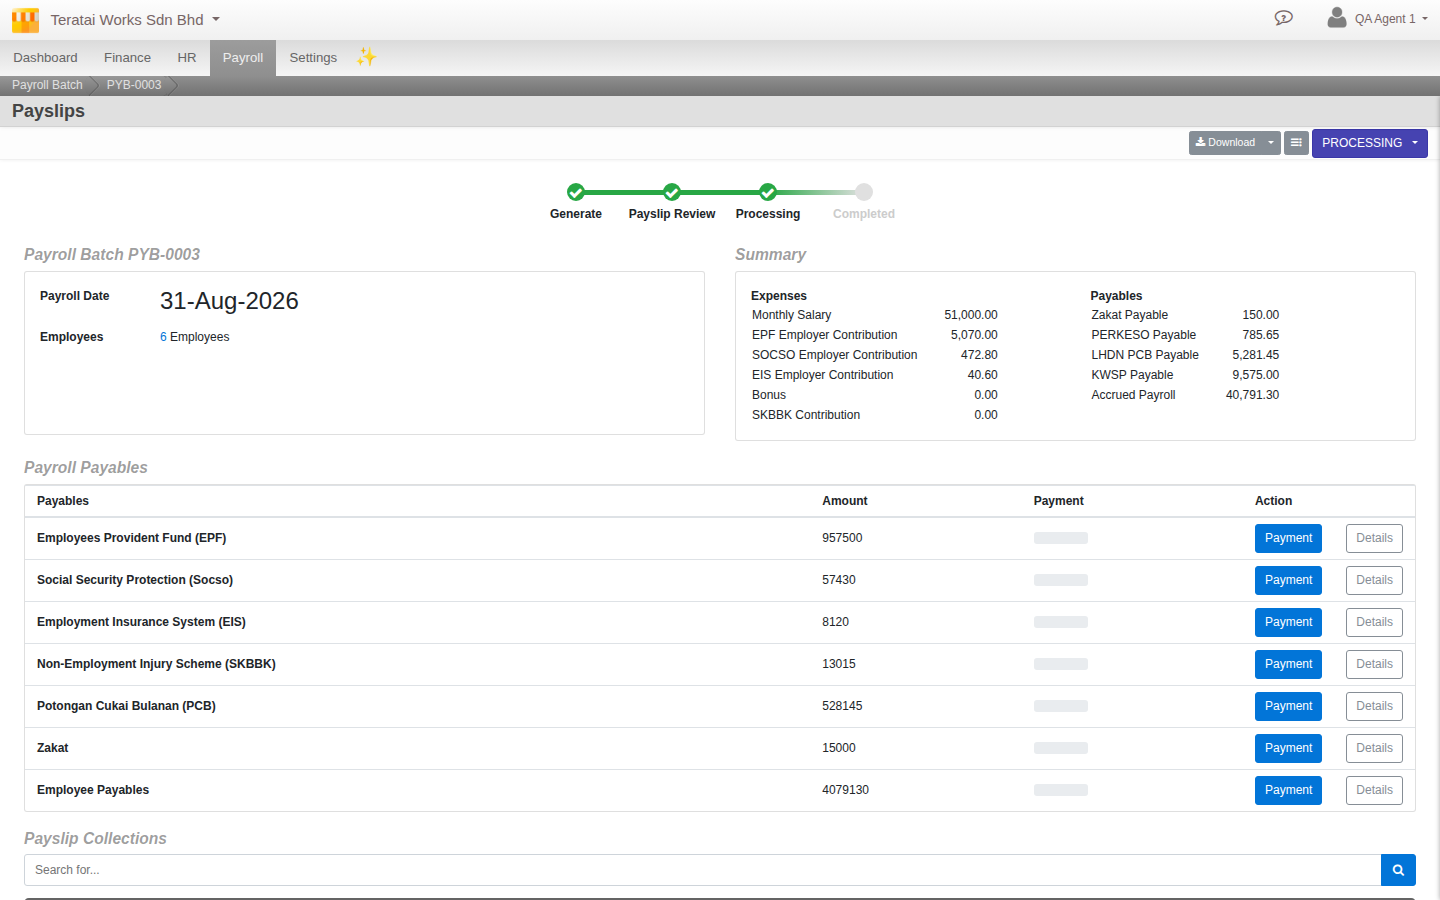
Concretely, confirming posts an expense for the gross pay and for the employer’s own share of statutory contributions (EPF, SOCSO, EIS and SKBBK all cost the employer something on top of salary, not just the employee), and it posts a liability for what is now owed: one slice to your Accrued Payroll ledger for everyone’s net pay, and one slice to each statutory body’s own liability ledger for what is owed to them. PCB is the one exception, it is a straight withholding from the employee’s own pay, not an extra employer cost.
Complete, later, is a different and much simpler step. It does not post anything to your ledgers at all. It is purely a lock that will not let you close out the batch until every one of those payables, statutory and employee net pay alike, has actually been paid in full. Think of Confirm as “the accounting is done” and Complete as “and now everyone has actually been paid.”
5. Issue payslips
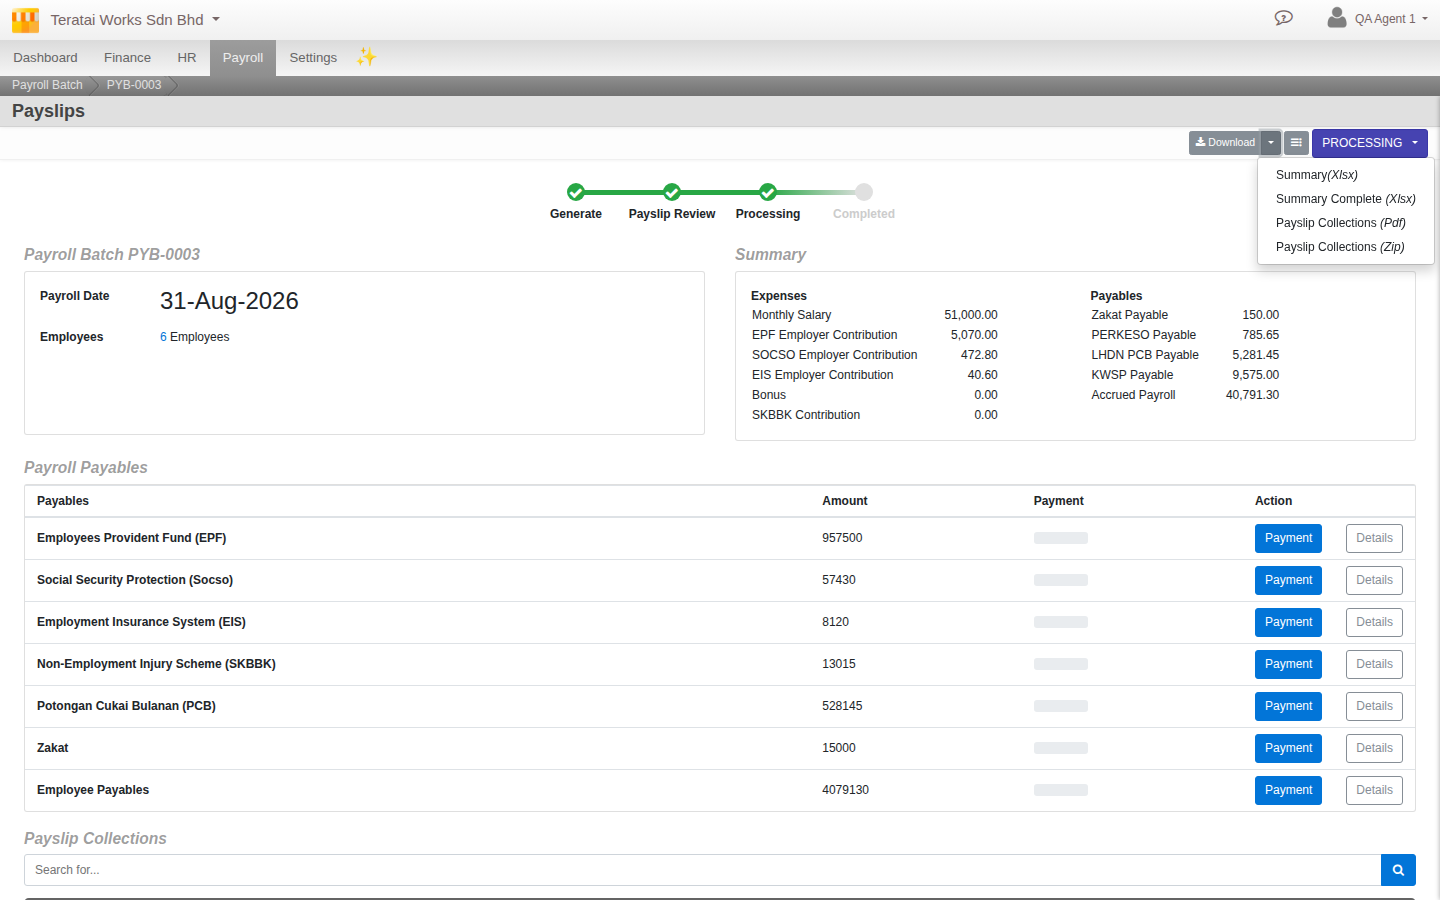
From the batch’s own Download menu, get a ZIP of every payslip PDF, a single collected PDF, or an XLS summary of the whole run, whichever suits how you distribute them. An individual payslip’s own PDF is available the same way from inside that one payslip’s own record, if you only need one.
6. Pay everyone
Every payable a batch generates, the statutory bodies and the employees’ own net pay, lands in the same place your vendor bills do: Menu > Finance > Payment > Issue Payment. A payroll batch (and, individually, its employees) simply shows up there as something you can pay, exactly like a vendor bill would. If you have already read the day-to-day operations guide’s payment step, this is the identical screen and the identical partial-payment, multiple-documents-at-once behaviour, nothing new to learn.
For paying employees specifically, there is also a real shortcut. Open the Employee Payables payable from the batch, and Cloudby can generate an actual bank-ready payment file for two banks by name, Maybank2U (MBB MAS Payable) and RHB (RHB Payroll), built to each bank’s own real file format, using the bank details each employee’s own record carries from step 2. You still take that file to the bank’s own online banking portal yourself and upload it there, Cloudby does not move the money, but it saves you keying in every employee’s transfer by hand. The screen’s own instructions are blunt about the rest: for anyone the file does not cover, you pay them individually and mark it done with a payment voucher, exactly the manual path described above.
What’s next
A few notes as you keep running payroll:
- Rates, contribution brackets and filing deadlines are not repeated in this guide on purpose, since they change on a schedule this guide will not track. The Compliance handbook is the source for those, and stays current independently.
- Once you reach a period close, a confirmed and fully paid payroll batch is exactly what the closing-your-financial-year guide expects to already be in place, there is nothing extra to do for payroll at close time beyond having actually run it.
- If a fuller HR module ships later, expect it to extend the same employee record this guide walks through today, not to replace it.
Scenarios and troubleshooting
Cloudby will not let me generate a new batch.
Check whether any employee still has an unconfirmed payslip from the previous batch. Batches are strictly sequential, confirm (or resolve) the outstanding one first.
I confirmed a batch but the numbers still look wrong.
Regenerating is only available while a batch is in Draft. Once confirmed, it has already posted to your ledgers, so a correction from here on is a real accounting entry, not a simple re-run. Get the Draft right before confirming.
Cloudby says setup is incomplete but I have installed my statutory items.
Check two things: that every installed item actually has a valid vendor and ledger mapping saved, and that at least one employee has been enrolled into at least one payroll item. Installed-but-unmapped or an org with zero enrolled employees both trigger the same nag.
I need to cancel a batch.
You can, but only before anything has actually been paid against it. Once even one payable has a payment or contra applied, you need to deal with that payment first before Cloudby will let the batch be cancelled.
Do I need to configure EPF or SOCSO rates myself?
No. Those are built into Cloudby and update automatically when the law changes. What you configure is which items apply to you and your own vendor and ledger mapping, not the tables themselves.
A bookmarked or refreshed link to the Setup Wizard bounces me straight back out.
Reach the wizard by clicking through from Payroll > Payroll Items > Setup Wizard rather than a saved link or a page refresh while on it. This is a known issue, not something wrong on your end.
Where do I actually enter an employee’s bank account?
Not in the Setup Wizard, and not as a separate item to install. Open the employee’s own record (Menu > HR > Employee) and go to their Payslip tab, the Payroll Payment Information section there is where bank details and every statutory account number for that employee live.
Related
- Reference: Hire to Pay (the underlying journey this guide operationalises)
- Reference: Payroll Setup
- Reference: Employee Configuration
- Reference: Payroll Batch
- Reference: Payslips
- Reference: Payment Processing
- Reference: Statutory payroll (Malaysia), for rates, brackets and deadlines
- How to: Run a payroll batch
- How to: Manage payslips