
Guides: Getting started
A full, hands-on walkthrough for a Malaysian business starting fresh in Cloudby, right at the beginning of a financial year: from your very first login, through SST and e-Invoice setup, to issuing and e-Invoicing your first sale. Written for a business owner, not an accountant. Every accounting term is explained the first time it appears.
Scope: Malaysia. If you already have a business running and are switching to Cloudby partway through your financial year instead, most of this still applies, but you will also need to bring your existing balances across; see the mid-year go-live guide instead, which covers everything here plus that one extra step.
Time: plan for a real working session, not five minutes. This covers a lot of ground on purpose. Get it right once and you will not need to redo it.
1. Create your account and your organisation
Signing up is a short wizard with four real stages: User Account, Solutions, Checkout, then Organisation. Here is exactly what each one asks for, and why it is shaped the way it is.
First, User Account: a Username, Email, Password and Confirm Password, nothing more. This creates your own personal login, separate from any business. Cloudby will offer to email you a validation code at this point; you can enter it now or come back to it later, it will not block you from continuing today. Once your account exists, you are signed in immediately and move on as yourself, not yet attached to any organisation.
This distinction is worth sitting with for a moment, since it shapes how access works everywhere else in Cloudby: your login belongs to you, the person, not to the business you are about to create. One login can belong to several organisations at once, each completely separate. You might be the owner (an administrator) of the business you are creating today, a limited user in a client’s organisation you were invited into, and a manager somewhere else, all from the exact same login, switching between them with an organisation switcher once you belong to more than one. None of that is relevant to you yet with only one organisation, but it is why leaving an organisation later never touches your account itself. See About account ownership for the full picture.
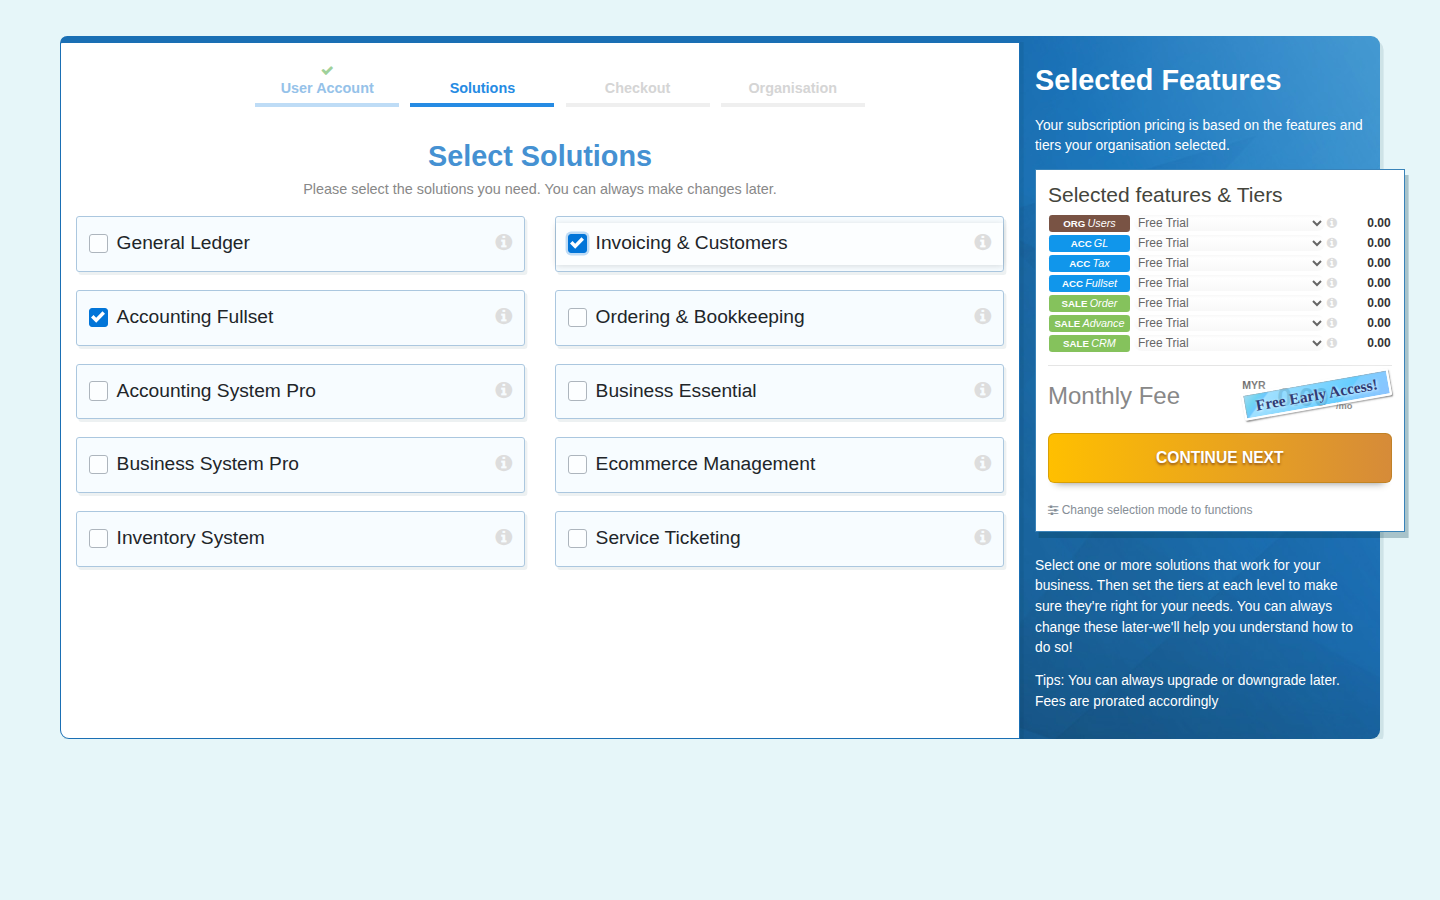
Next, Solutions: a grid of ready-made bundles, not a simple list of individual modules. Real examples: General Ledger, Invoicing & Customers, Accounting Fullset, Ordering & Bookkeeping, Accounting System Pro, Business Essential, Business System Pro, Ecommerce Management, Inventory System, Service Ticketing. For this guide, tick Accounting Fullset and Invoicing & Customers; that combination covers everything from here on (Chart of Accounts, tax, e-Invoice, sales invoicing). Each bundle you tick expands into the individual features it actually contains, shown on the right with a running total, so you can see exactly what you are getting rather than trusting a bundle name alone.
Then Checkout: the same features restated as a plain itemised list with a monthly fee total, and a genuine agreement checkbox for Cloudby’s Terms of Service and Privacy Policy. You must tick this to continue; there is no way around it.
Finally, Organisation: tell Cloudby about your business. Only two fields are actually required: Brand Name and Company Country. Everything else, registered name, registration number, state, city, address, logos, sits behind an optional “more details” section you can expand now or skip and fill in later. You will also see Timezone and Currency fields on this screen; for a Malaysian organisation these are set for you regardless of what you pick here, so there is nothing to get wrong on this particular pair of fields.
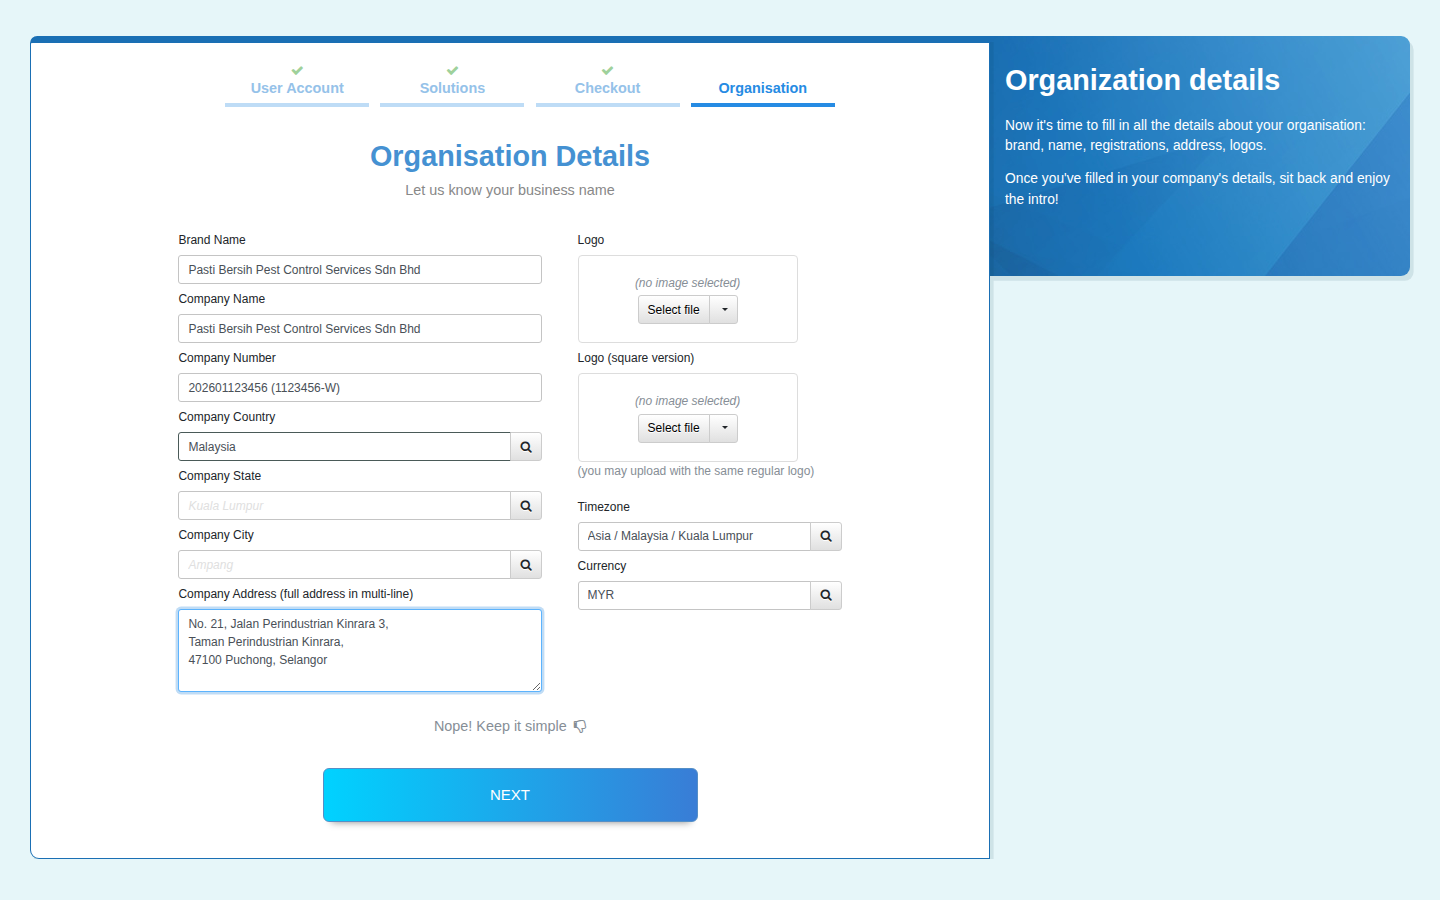
Submitting this last step is the moment your organisation actually comes into existence: a bare set of ledgers and the specific features you picked in Solutions all get provisioned together, in one go. You still build out your real Chart of Accounts yourself in step 4 below; this just lays the groundwork. You are then taken straight to your new organisation’s Dashboard, with a short one-time welcome animation the first time it loads.
2. Your first login, and what the dashboard is telling you
Once you land on your Dashboard, two tabs matter most on day one:
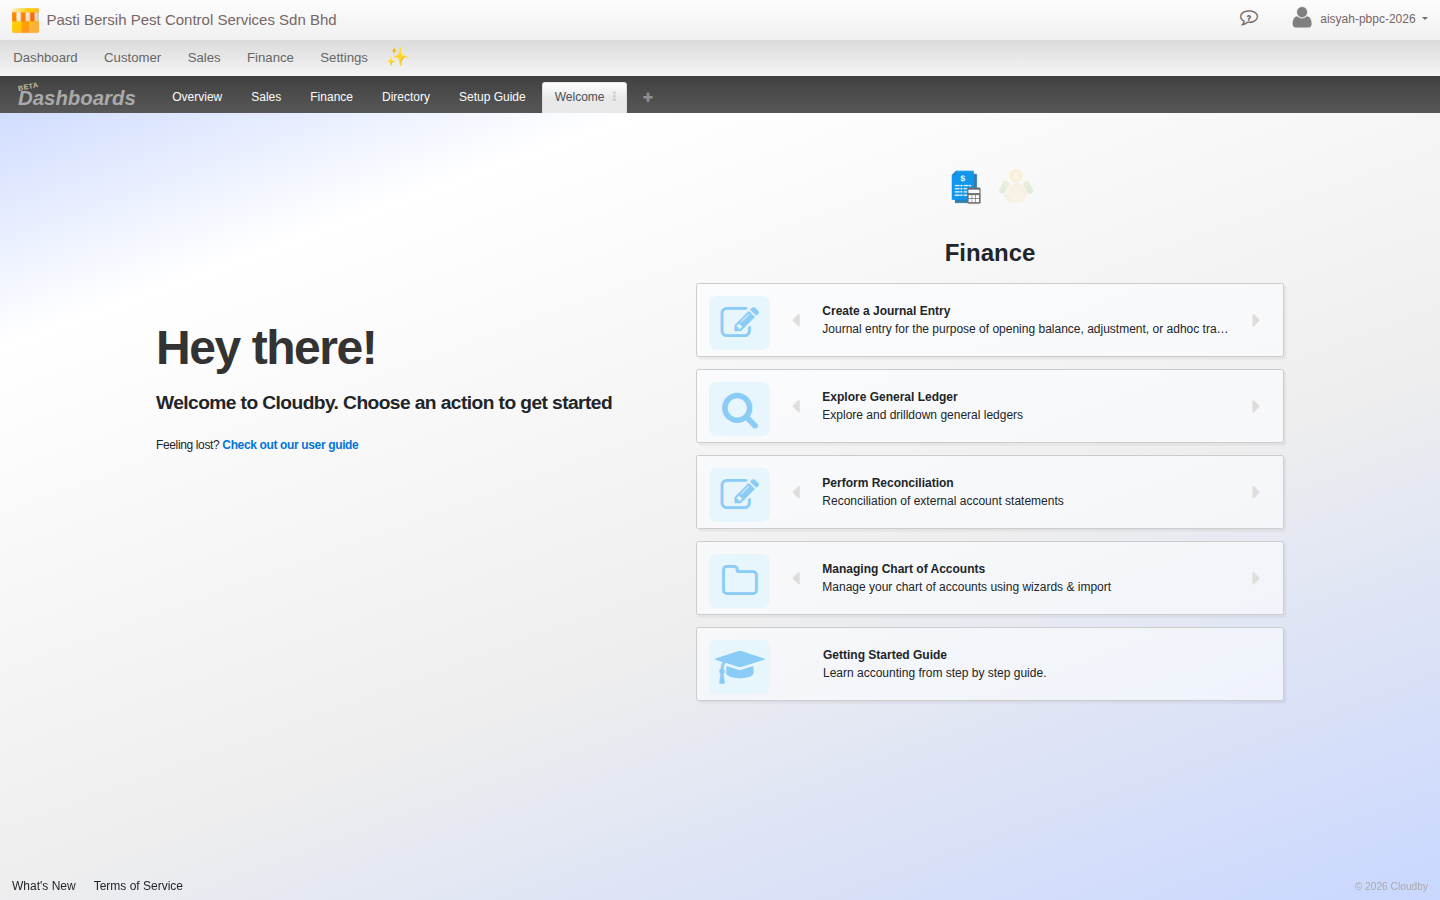
- The Welcome tab shows quick-action cards for common first tasks, things like creating a journal entry or managing your Chart of Accounts (used in step 4).
- The Setup Guide tab is a running checklist, grouped by area (Organisation, Finance, Sales), each with a percentage complete. This is not something you must finish in order. It just tracks what is done and what still needs attention, so you always know where you stand. Keep it open in another tab as you work through this guide; watching the percentages climb is a good way to confirm you are on track.
3. Set your financial year
Before anything else, a quick concept: your financial year (also called a fiscal year) is the 12-month period your accounts and tax filings run on. Most Malaysian SMEs run a calendar financial year, January to December, but yours might run differently (say, July to June). Check with your accountant or your company’s registration if you are not sure. All Cloudby needs from you here is your Financial Year End: a day and a month, set once under Menu > Finance > Settings > Financial. That is genuinely the entire setup for this: two dropdowns, nothing more.
Since you are starting fresh, set this once at the very beginning and every transaction you record from here on simply falls inside that financial year. There is nothing further to configure and no separate “starting fresh” toggle to look for.
4. Build your Chart of Accounts
Here is a term worth explaining properly, since everything else in this guide sits on top of it: a Chart of Accounts is simply the complete list of “buckets” your business uses to record money: a bucket for your bank balance, a bucket for money customers owe you, a bucket for sales income, a bucket for rent expense, and so on. Every transaction you ever record in Cloudby (an invoice, a payment, a journal entry) moves an amount between two or more of these buckets. Accountants call each bucket a ledger or account; this guide uses “account” and “ledger” interchangeably, matching what you will see on screen.
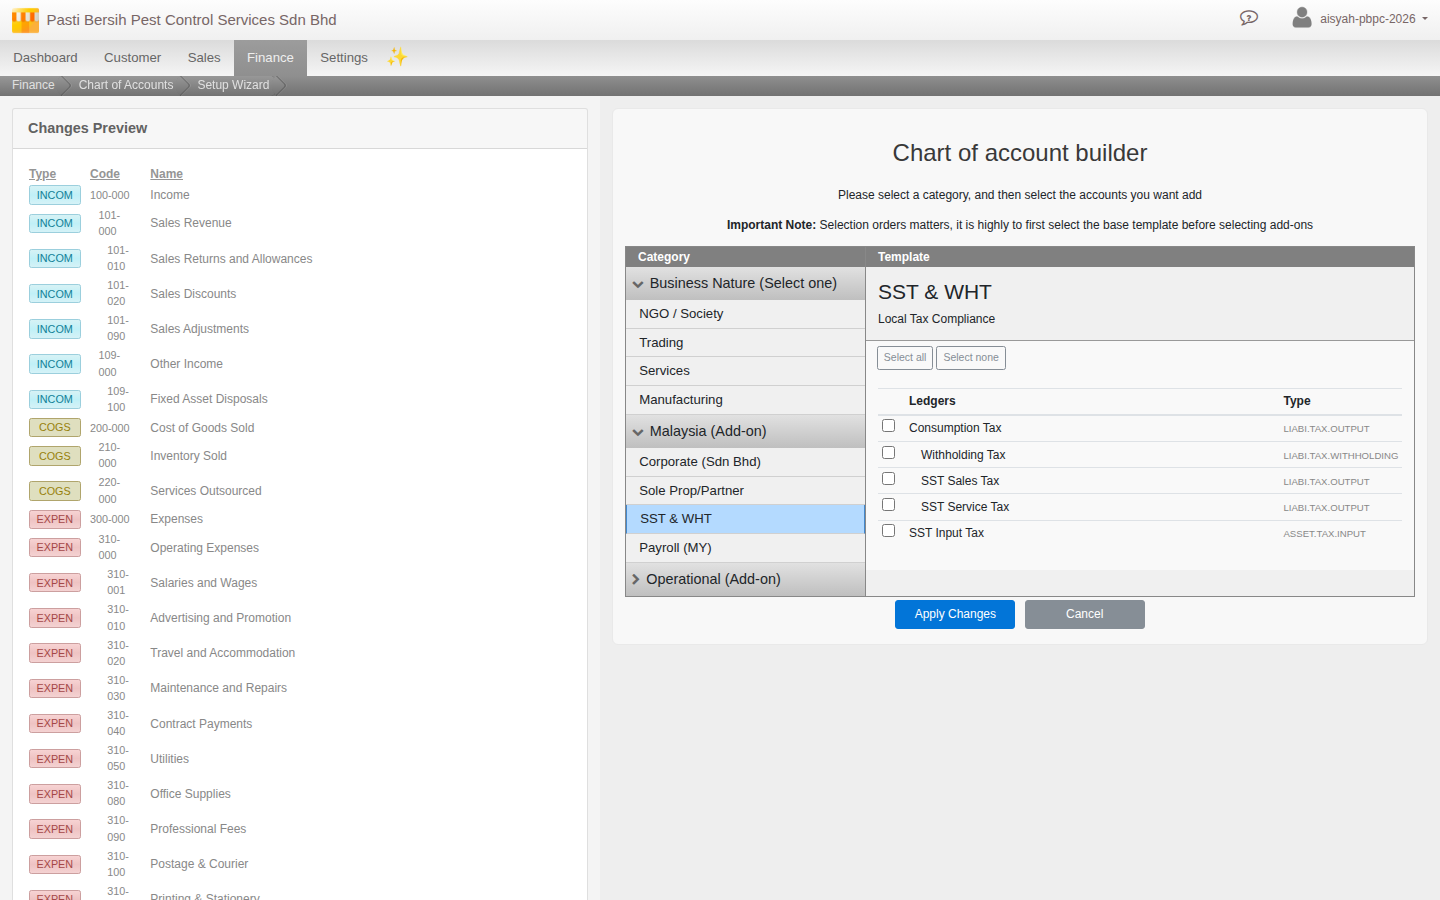
You do not have to build this list from scratch. Go to Menu > Finance > Chart of Accounts > Setup Wizard and choose Chart of account builder. You will see two things: a live preview of the resulting account list on the left, and a category tree on the right. Pick one base template that matches your business (Trading, Services, Manufacturing, or NGO/Society), then look for Malaysia (Add-on) and expand it. You will find four separate chapters you can add on top of your base: Corporate, Sole Prop/Partner, SST & WHT, and Payroll (MY). Pick the ones that apply to you; for most SST-registered SMEs without payroll in Cloudby yet, that is your business-type base plus SST & WHT.
5. Switch on SST
A quick refresher, since this guide assumes no prior tax background: SST stands for Sales and Service Tax, Malaysia’s two-part indirect tax. If you added the SST & WHT chapter in step 4, the tax groups you need (Service Tax, Sales Tax at its various rates, and the exemption codes) are already created for you, and the current 8% Service Tax rate is already active by default. You do not need to manually set anything up from scratch. What you do need to check is one specific field.
B1_10 & B2_11C. That is a reference to a box on Malaysia’s SST-02 tax return form, not the code e-Invoicing actually needs. Replace it with a real MyInvois tax classification code: 02 for Service Tax (or 01 for Sales Tax, 06 for not-applicable/exempt, on the relevant items). This matters later: every e-Invoice line needs a correct code here to pass validation.For the full detail on SST in Cloudby (exemptions, filing the SST-02, day-to-day tax handling on your documents), see the dedicated SST guide. This section only covers what you need to get through the rest of this journey.
6. Connect e-Invoice
Another quick refresher: e-Invoice (run by LHDN through a system called MyInvois) is Malaysia’s electronic invoicing mandate. Instead of just handing a customer a PDF invoice, an e-Invoice is submitted electronically and validated by LHDN before it counts as a legally recognised document. Go to Menu > Finance > Settings > e-Invoice. You will find a Main tab (choose Provider = Malaysia LHDN, and set a Commence Date, which should match your real go-live date) and a Malaysia LHDN tab where you fill in your business’s own tax identity: TIN, BRN, SST number, and address. You will also need to search for your MSIC code here, a standard industry classification code. Just type a few words describing what your business does and pick the closest match from the real, searchable list.
Once your identity fields are filled in, run the Compliance Checker (under Menu > Settings > Organisation). This is worth using properly, not skimming past: it checks your Chart of Accounts, Tax, and e-Invoice setup against what a real submission needs, and shows a clear Pass/Warn/Fail per item, with a plain-language explanation of what is wrong and what to do about it. Some issues even have a one-click Fix button. Work through anything marked Fail; a Warn is often fine to leave (for example, a note that you are still connected to LHDN’s testing environment is exactly what you want while you are testing, not a problem).
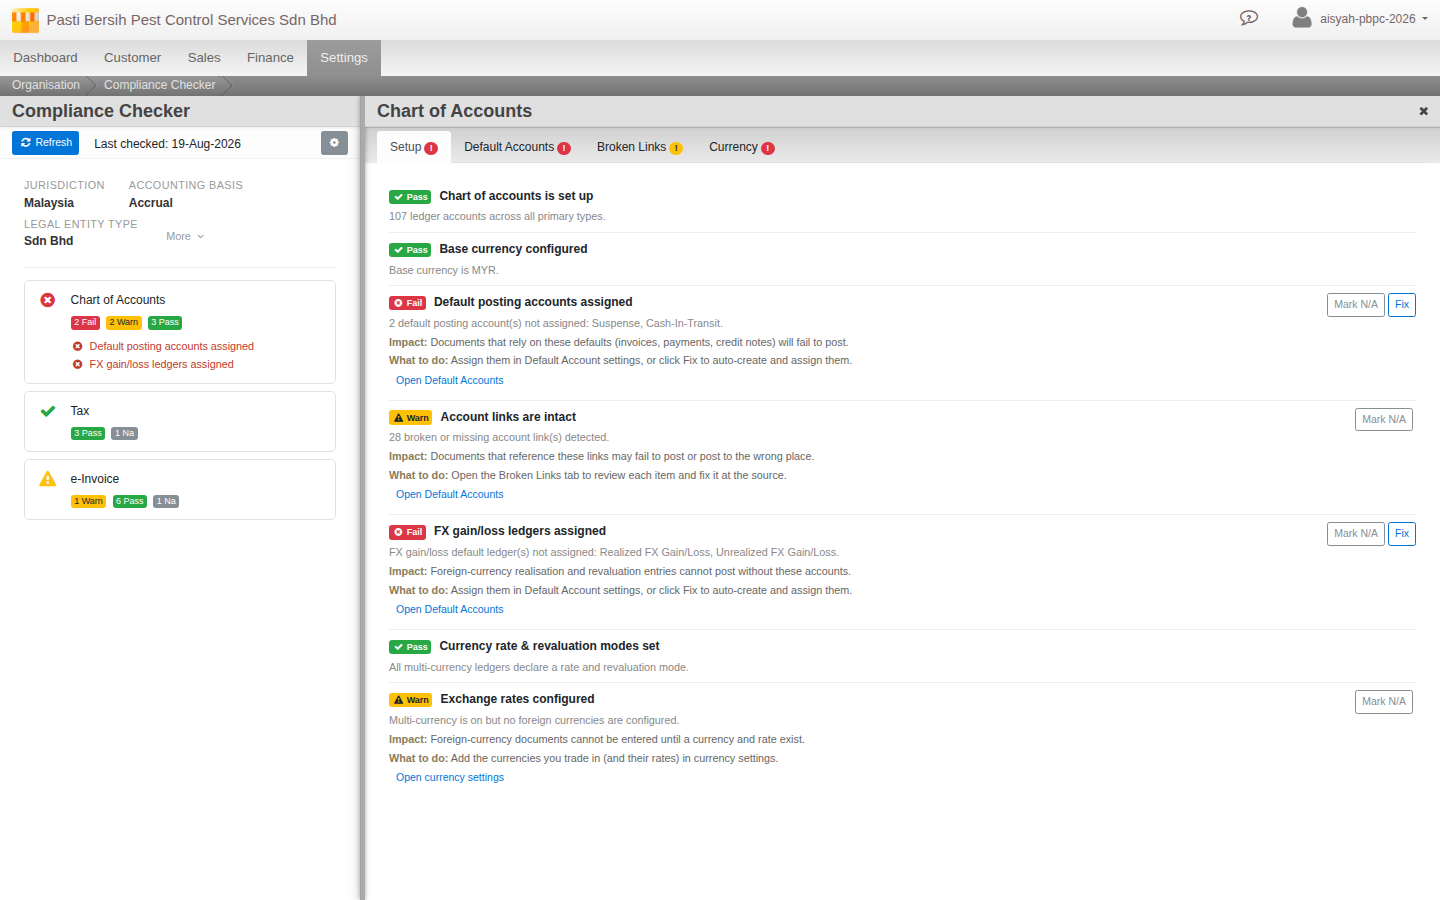
For the full e-Invoice picture (the document lifecycle, receiving supplier e-Invoices, the recommended flow for an SME), see the dedicated e-Invoice guide.
7. Add your first customer
Go to Menu > Customer > Company > New Company and add the business or person you are about to invoice: name, registration number, address, and so on. For just one or two customers to get started, entering them by hand here is simpler than a bulk import; if you have an existing customer list to bring across later, see importing data.
8. Issue and e-Invoice your first sale
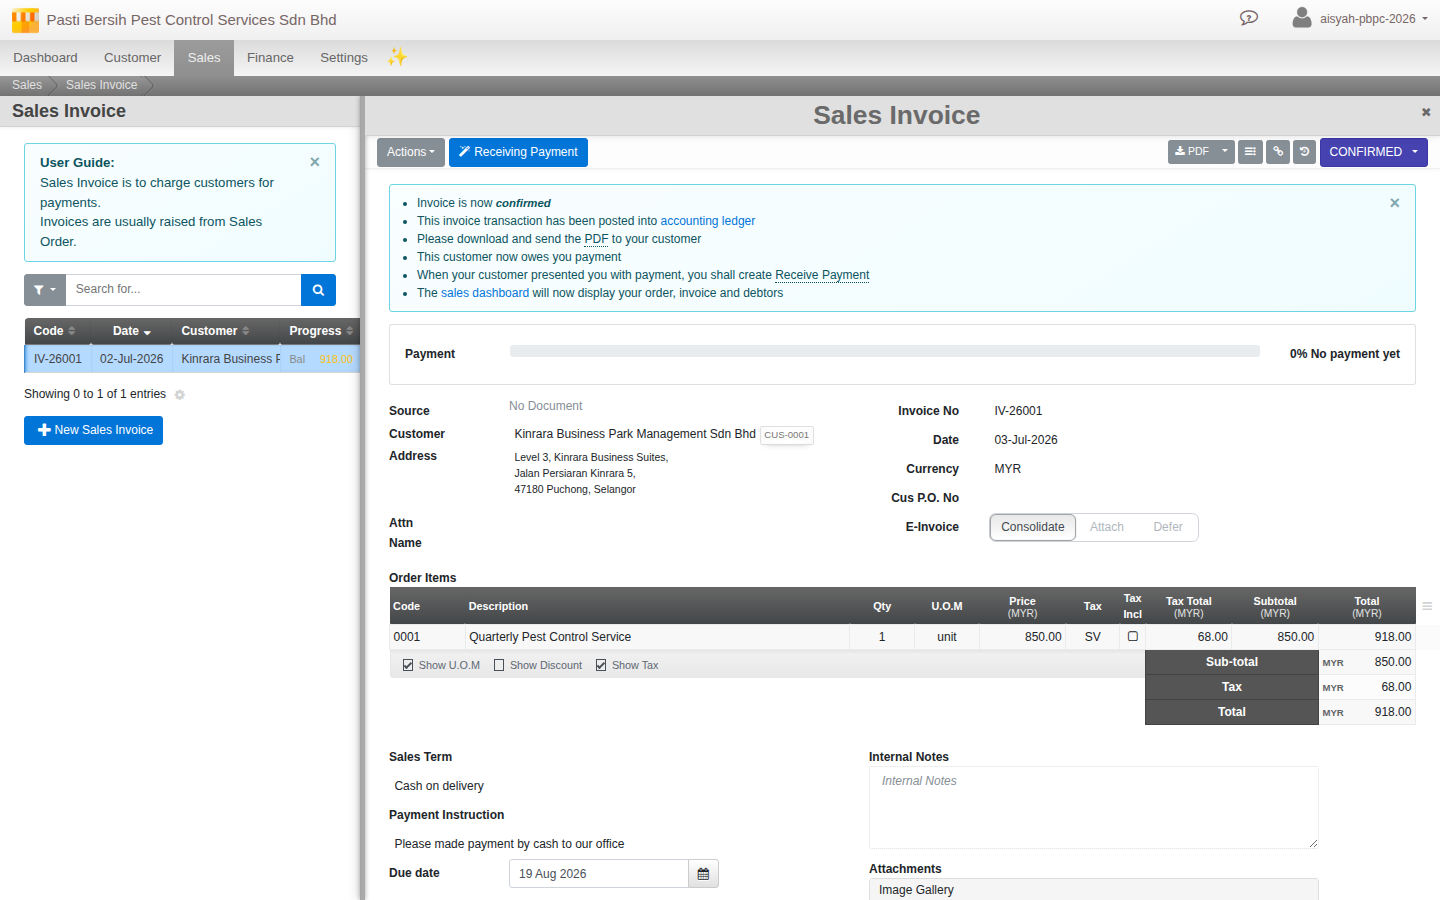
Now the payoff: your first real transaction in Cloudby. Go to Menu > Sales > Sales Invoice > New, pick the customer you added in step 7, and add a line for what you are selling: a product or a service, with its price. Reveal the Tax column and choose the correct tax group (Service Tax Standard, for most services); Cloudby calculates the tax for you and shows the total. This is worth a moment’s appreciation: you never type a tax amount yourself anywhere in Cloudby, you just pick the right tax group on the line and the arithmetic happens for you.
When you confirm the invoice, that confirmation is the e-Invoice submission. There is no separate “now submit it” step. You will see an e-Invoice action choice on the document: choose Consolidate, for the reason explained in step 7. Confirm, and Cloudby submits it.
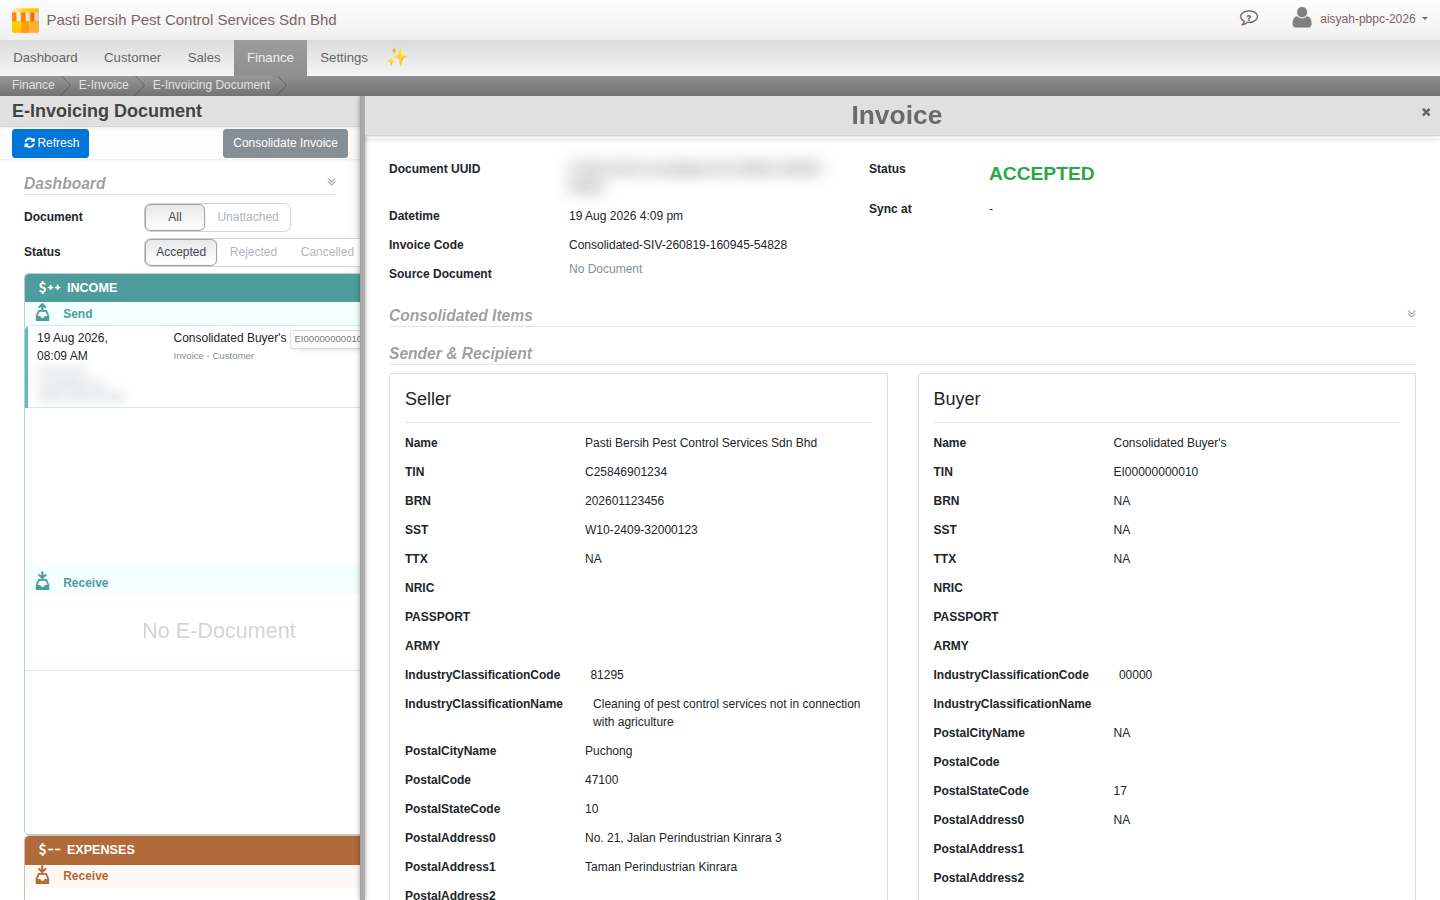
Give it a few minutes, then open the e-Invoice document from the invoice (or from Menu > Finance > E-Invoice) to watch its status. A real submission moves from a sending/pending state to Accepted once LHDN has validated it. At that point, it is a legally recognised document, and you can open it to see the official version Cloudby holds, including the seller and buyer details LHDN itself received.
9. What’s next
At this point you have a real, working Malaysian organisation in Cloudby: SST configured, e-Invoice connected, and one sale already through the full cycle. A few honest notes as you keep going:
- Your dashboard’s Revenue tile shows only the current calendar month. If you have only just issued your first invoice partway through a month, do not be alarmed if it briefly reads RM0.00. Check the trend chart just below it, which shows your real figures by month.
- Keep the Setup Guide checklist from step 2 open as you add more customers, products, and settings over your first few weeks. It is a good running To Do list, not a one-time thing.
- Once you are confident everything is correct, come back to e-Invoice setup and switch your connection from testing to live, so future documents count for real with LHDN.
- Once you are running day to day, from invoicing through to reports, the day-to-day operations guide is next: selling, buying, getting paid, paying out.
For the deeper material on each part of this journey, see the SST guide and the e-Invoice guide, and the Taxation reference for how tax fits into Cloudby generally. If you skipped verifying your email in step 1, or want to set up two-factor sign-in, see Your profile and security.
Scenarios and troubleshooting
I clicked Apply Changes on the Chart of Accounts wizard and nothing showed up.
You almost certainly did not click Select all (or tick individual rows) before Apply Changes. The checklist starts empty and applies nothing if left untouched, with no warning. Go back into the wizard and redo it, ticking the accounts you want first.
I actually do have money, debts or assets from before I started using Cloudby. What do I do?
This guide assumes a genuinely clean start. If your business already existed before Cloudby (even informally, on spreadsheets or another system), you have a starting position to bring across: cash in the bank, amounts customers owe you, equipment you own, and so on. See the mid-year go-live guide‘s opening-balances section, which applies regardless of whether you are actually switching mid-year or just have prior figures to enter.
Why does my e-Invoice show “Consolidated Buyer” instead of my customer’s name?
See step 7 above. Cloudby cannot yet capture a customer’s tax ID, so individual e-Invoices addressed to a named buyer are not currently possible. Consolidated e-Invoicing is a real, legitimate alternative, not a workaround; your invoice itself still correctly shows your actual customer.
Do I need an accountant to do this?
Not to follow this guide. Every step here is designed to be done by a business owner. If your setup is more involved than a straightforward fresh start (multiple bank accounts, existing debts to specific suppliers, and so on), it is worth having an accountant confirm the mid-year guide’s opening-balance steps apply to you.
FAQ
Should I wait for a new financial year, or switch to Cloudby now, mid-year?
Either works, and Cloudby has no preference. Waiting for a new financial year, as this guide assumes, means no opening-balance journal entry to prepare, which is simpler; starting mid-year means you do not have to wait, at the cost of one extra journal entry covered in the mid-year guide. Most businesses find switching as soon as they are ready is worth that one extra step, rather than waiting.
Does Cloudby file anything with LHDN or Customs for me automatically?
e-Invoice submission itself is automatic once you confirm a document. Tax returns are not: the SST-02 is still filed by you on the MySST portal (see the SST guide), using figures Cloudby prepares for you.