Scope: the smallest real setup that gets you from nothing to your first invoice, first payment, and a real profit and loss statement. If your business also buys and sells physical stock, employs staff, or needs SST or e-Invoice compliance switched on from day one, see Starting fresh: SST, e-Invoice and your first invoice instead, a fuller guide built for that.
Time: about 20 minutes to get set up, then a reference to come back to for your first few invoices.
1. Set up your organisation
Sign up and work through the setup wizard: your account, then your organisation’s brand name and country. Only Brand Name and Company Country are actually required here. Everything else, registration details, address, logo, can be filled in later.
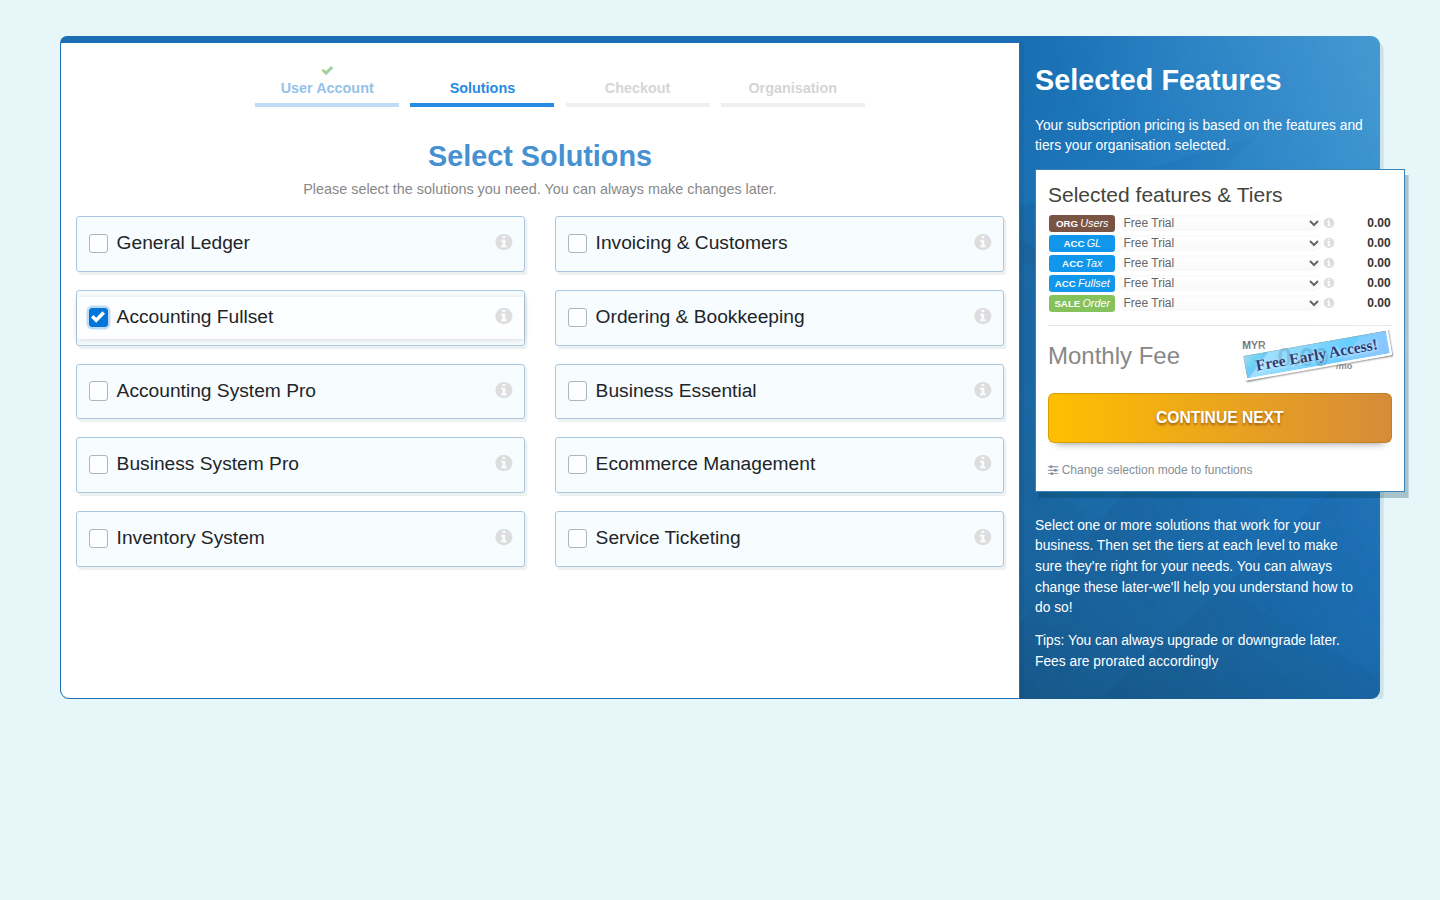
Next comes Solutions, a grid of ready-made bundles rather than a list of individual modules to switch on one by one. For this guide, tick just Accounting Fullset. It already includes basic sales and invoicing alongside real double-entry accounting, so it is the one bundle that covers everything in this guide on its own. You do not need to also tick Invoicing & Customers or anything else; that would give you more than a freelancer setup needs.
2. Build a starter chart of accounts
Your Chart of Accounts is the list of accounts everything you do posts to: sales, expenses, your bank, what customers owe you. You do not have to build it account by account. Open Menu > Finance > Settings > Chart of Accounts and use the Setup Wizard.
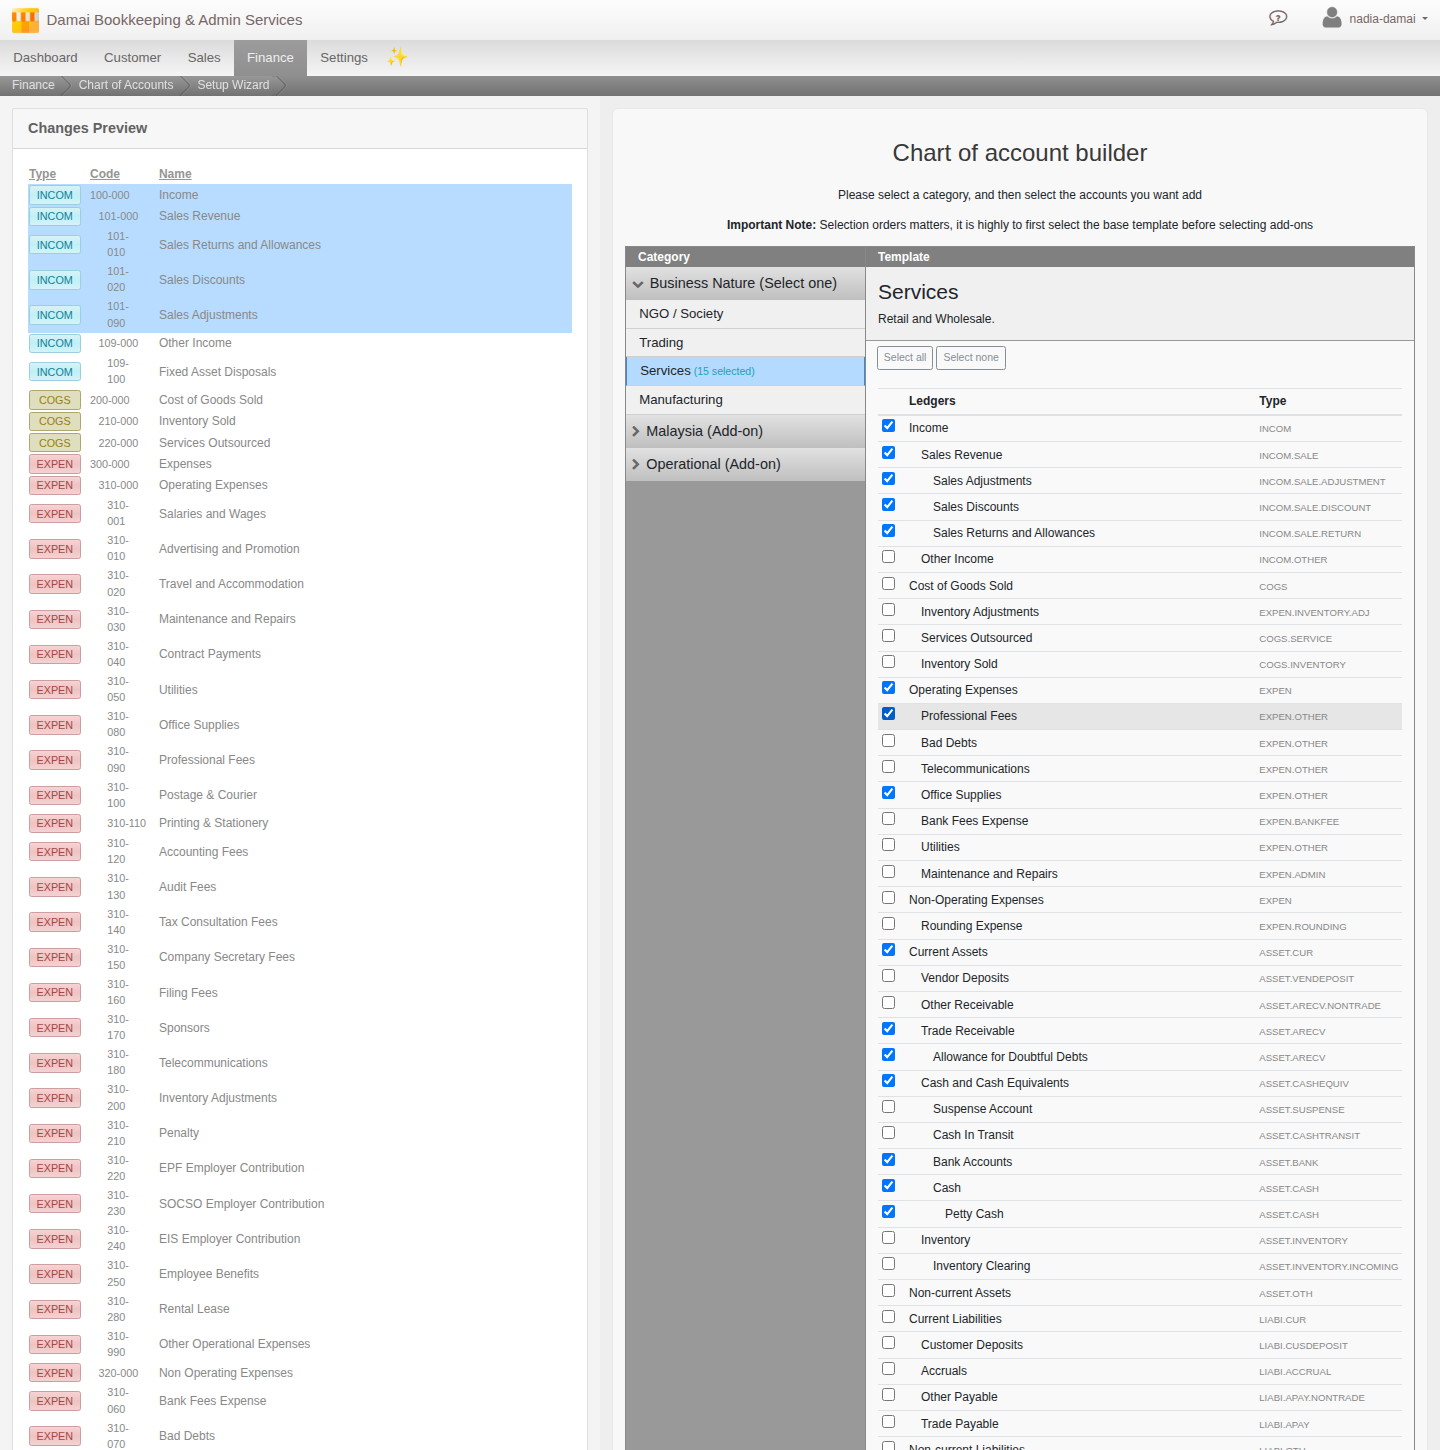
A new organisation already starts with a full default chart of accounts, so the wizard adds to what is already there rather than building one from a blank page. Choose Chart of account builder, then pick Services under Business Nature, its required first, single pick (the other options are NGO/Society, Trading, and Manufacturing). Malaysia sits separately as an Add-on category for later, layered on top if you also need country-specific accounts such as SST or payroll, not the base itself.
With Services selected, use Select none, then tick only what a small service business actually needs to start: Sales Revenue, Bank Accounts, Cash, and Trade Receivable, plus one or two Expense accounts for costs you already know you will have, Office Supplies and Professional Fees are a reasonable pair for most freelancers. Ticking an account also ticks its parent group automatically, so the running count next to the template name (for example, “Services (15 selected)”) will read higher than the handful of boxes you actually clicked, that is expected. You can always add more accounts later as your business needs them.
3. Add your first customer
Open Menu > Customer > Company and click Create. Give it a Name, and a registration number if it is a company. The Receivable (Ledger) field usually defaults to a Trade Debtors account already, so most freelancers can leave it as is.
4. Issue your first invoice
Open Menu > Sales > Sales Invoice > New. An invoice can stand on its own, you do not need a Quotation or a Sales Order behind it first. Pick your customer, add a line for what you are selling, and confirm.
5. Record the payment
Once your customer pays, open Menu > Finance > Receive Payment and choose New. Set Payer to Customer and pick them. Their outstanding invoice loads automatically, so you just confirm the amount and which bank or cash account the money went into.
6. Read your profit and loss
Open Menu > Finance > Reports and run Profit & Loss, one of the Core Statements. It totals your income against your expenses for the period, using exactly the accounts you set up in step 2. If a number looks wrong, it is almost always because an invoice or a payment has not been confirmed yet, only confirmed transactions post to your books.
What’s next
This covers a small business end to end. As you grow, the same organisation grows with you rather than needing a fresh start: Day-to-day operations covers the fuller domestic sales and purchase cycle once you are billing regularly and buying from vendors too, and Closing your financial year covers what to do at your first year end.
Scenarios and troubleshooting
My Profit and Loss shows nothing, or looks too low.
Check that your invoice is actually Confirmed, not sitting in Draft. Only confirmed documents post to your accounts.
I need an account I did not tick in the Setup Wizard.
Add it directly under Menu > Finance > Settings > Chart of Accounts. Pick the right parent, give it a name and a type, and it is ready to use immediately, no need to rerun the wizard.
I am now buying stock, hiring staff, or need SST or e-Invoice. Do I need to start over?
No. Your organisation and books carry forward as they are. Add the modules you now need (Purchase, Inventory, Payroll) and follow Day-to-day operations or the SST and e-Invoice guides from there. Nothing about this starter setup needs to be undone.
Related
- Reference: Chart of Accounts
- Reference: Customer
- How to: Set up your Chart of Accounts
- How to: Add a customer
- How to: Sales Invoice and Sales Order
- How to: Receive a customer payment
- How to: Finance reports
- Guide: Running your business day to day in Cloudby
- Guide: Starting fresh: SST, e-Invoice and your first invoice
- guide_category set to Onboarding (125), standalone, not wired into the trunk/spoke Guide chain map. Confirm this is the right category before publishing, Finance (117) is the alternative if the owner would rather it sit with the other operational guides.